MotionEdge and Shutter Speed Prioritization
MotionEdge prioritizes shutter speed so your impact frames come out sharp. It starts at a 1/250 second shutter and auto-adjusts from there — keeping auto-exposure on and floating ISO up to hold brightness — so the camera favors freezing the fast-moving clubhead over the smoothest-looking video.
In bright light it automatically goes faster than 1/250 (1/500, 1/1000 and beyond) for even less blur. If light gets too low to hold 1/250, it eases back through 1/125 → 1/60 so you never end up with a frame too dark to use, then ratchets back up when light returns.
You don't have to set anything for this — it's how MotionEdge captures by default. The rest of this guide is for the two cases where you'd still touch the controls:
- Indoor LED projector / simulator — a fast shutter can catch LED flicker; turn Fast-Shutter Mode OFF (see § The indoor-simulator exception).
- You want to force a shutter even faster than the software is already choosing — drag the manual shutter slider (see § Where the controls are).
What's going on at impact
If your impact frame looks like a smear instead of a sharp picture of the club, you're seeing motion blur. The clubhead is moving roughly 80–120 mph at impact, your hands cover several feet during the downswing in under half a second, and the camera's shutter has to be quick enough to freeze that motion in a single frame.
Left to its own devices, the iPhone (and iPad) camera optimizes for clean, low-grain video — the right trade for most things you film, and the wrong one for a golf swing. MotionEdge's shutter-priority capture flips that trade for you automatically.
The trade-off in one paragraph
There are two knobs that control how each frame is exposed:
- Shutter speed — how long the sensor "looks" for each frame. A faster shutter (e.g. 1/500 s) freezes motion. A slower shutter (e.g. 1/60 s) lets in more light but blurs anything that moved during the frame.
- ISO — how much the sensor amplifies what it sees. Higher ISO brightens the image but adds grain.
When light is fixed, you trade one for the other. If you speed up the shutter, the frame gets darker, so you have to raise the ISO to compensate. The honest summary: for a golf swing, a sharper-but-grainier frame is better than a cleaner-but-blurry one. You can see what your wrist did. The pose detection can find it. The AI Coach can analyze it. A blurry frame loses all of that.
A general-purpose camera gets this trade-off backwards for golf. MotionEdge sets it the right way by default — and the controls are one tap away if you want to fine-tune.
Where the controls are
In the camera view, look at the top bar. There's a sun icon (☀️) — tap it.
A card slides up with:
- A Fast-Shutter Mode toggle at the top (yellow lightning bolt). ON by default — holds the shutter at 1/250s or faster and floats ISO to compensate. The caption underneath shows the current effective floor (eases to 1/125 / 1/60 / Off when light is too low to hold 1/250).
- A Shutter Speed slider with a clock icon
- An ISO slider with an aperture icon
- A Reset button to return to Automatic (re-engages Fast-Shutter Mode if you have the toggle on)
- A label showing Automatic or Manual
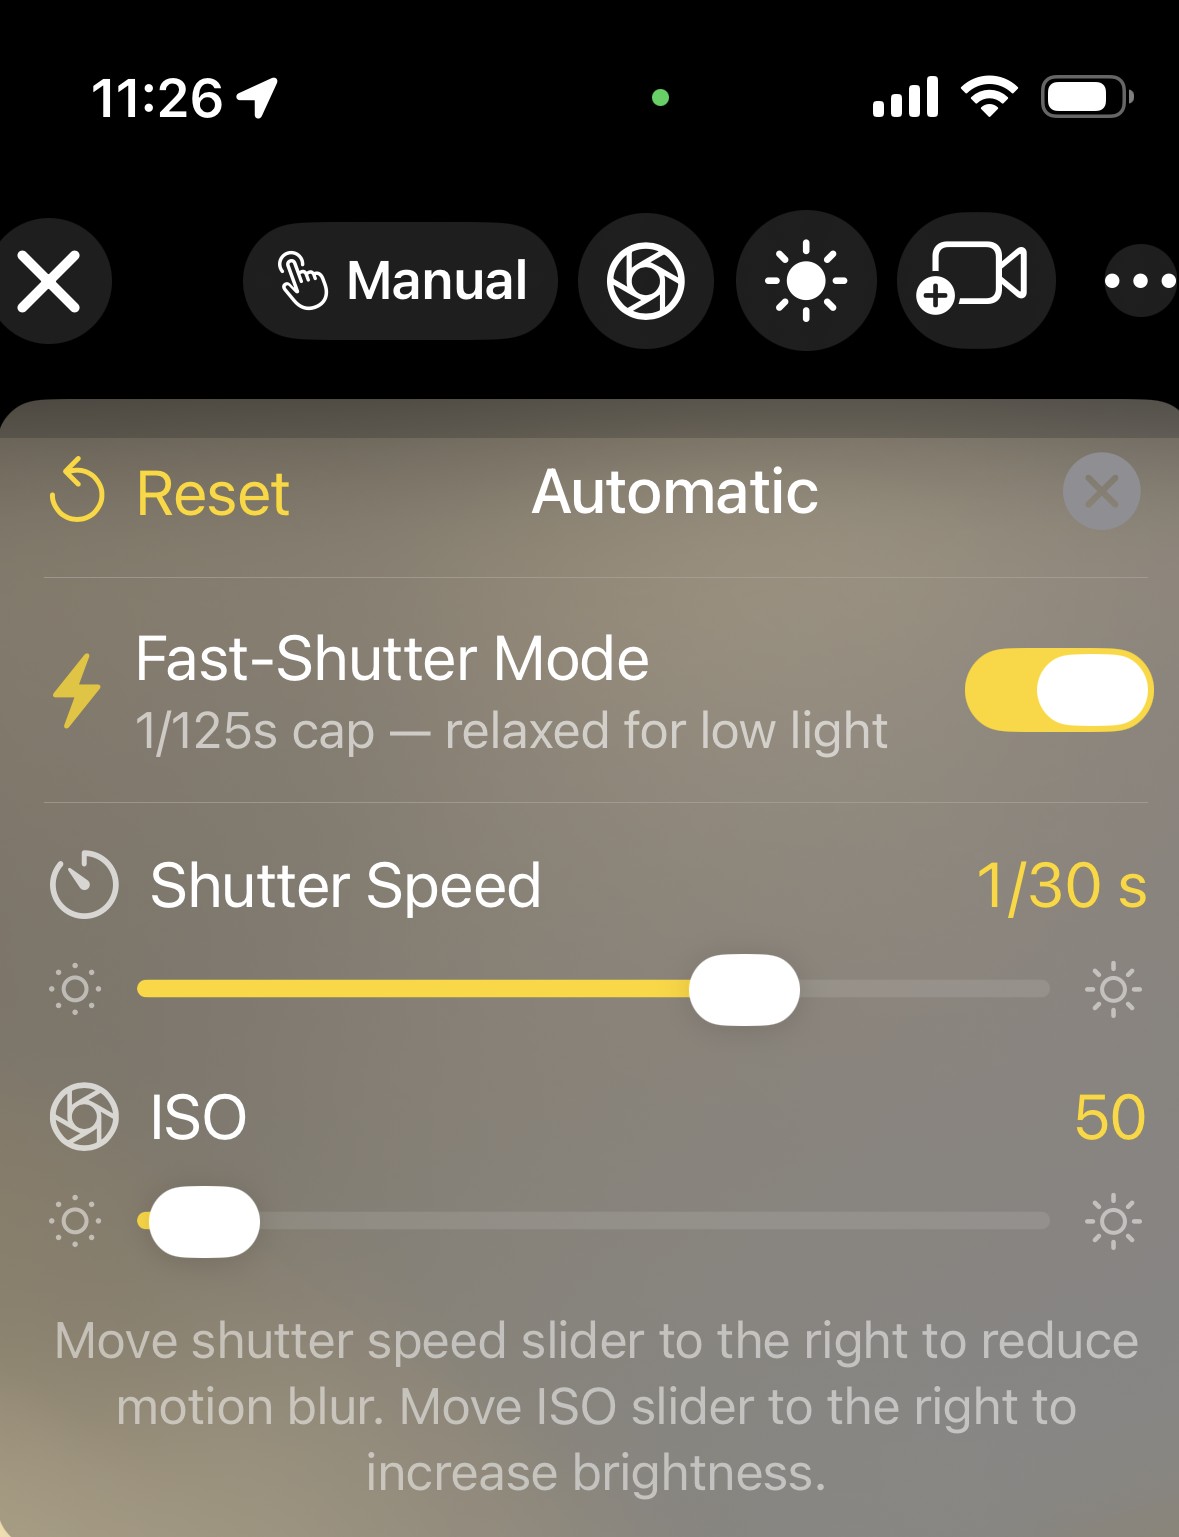
When the sun icon is white, the camera is on Automatic (with Fast-Shutter holding the shutter at 1/250s or faster). When it's yellow, you've engaged a manual setting — Fast-Shutter steps aside for the duration of the session.
Move the shutter slider right → forces a faster shutter than the camera is already choosing → less motion blur. Move the ISO slider right → brighter image (compensates). Either gesture exits Fast-Shutter mode and goes full manual.
To go back to Fast-Shutter Mode after a manual session: tap Reset, or close + reopen the camera (the toggle state persists across sessions).
Suggested starting points by environment
Try these as a starting point. Every range and every camera has its own light, so adjust by eye after a couple of swings.
| Environment | Shutter speed | ISO |
|---|---|---|
| Bright sun, outdoor range | 1/1000 s | Whatever the slider settles around naturally (usually 50–100) |
| Cloudy / shaded outdoor | 1/500 s | Slightly higher — usually 200–400 |
| Indoor range, normal LED or fluorescent lighting | 1/250 s | Higher — 400–800 typically |
| Driveway, garage, or evening session | 1/250 s | Whatever's needed to keep the image bright enough |
| Indoor simulator with LED projector | Leave on Automatic | See warning below |
If you're in good outdoor light, you can go as fast as 1/2000 s without losing much. Beyond that you start getting into territory where ISO has to climb high enough that grain becomes distracting.
The indoor-simulator exception
This is the one place where faster shutter makes things worse, not better — including MotionEdge's shutter-priority default.
Indoor LED projectors (and many LED ceiling panels in modern simulator bays) don't actually emit light continuously. They flicker on and off many times per second to control brightness. Your eye can't see it, but a fast camera shutter can — it catches the light in the middle of an "off" cycle and you get:
- Dark bars rolling through your video
- Occasional frames that are almost completely dark
- Pose detection failing at exactly the impact moment because the camera caught a dark cycle
The iPhone's pure-Automatic mode (without the Fast-Shutter cap) deliberately picks slower shutter speeds indoors specifically to average out this flicker. In a simulator: open the exposure card (☀️ icon) and turn Fast-Shutter Mode OFF. The auto-relax ladder helps in most low-light scenarios but can't tell flicker apart from "genuinely dim light," so the user toggle is the escape hatch.
Rule of thumb: if you're in a golf simulator under a projector, turn Fast-Shutter OFF and rely on the higher frame rate (60 fps) to give you enough frames that one of them lands at the right moment. The Indoor Simulator FPS FAQ has more on this.
If you can't tell whether you're in a flicker-prone environment, the easy test: leave Fast-Shutter on and shoot a 5-second clip. Play it back. If you see horizontal bars rolling through the frame or rhythmic brightness changes, you're seeing LED flicker — turn Fast-Shutter Mode off.
A note about how the manual sliders work today
When you move the shutter slider, the camera switches to Manual mode and pins the ISO at whatever it was just measuring. When you move the ISO slider, the same thing happens in reverse — the shutter gets pinned.
The practical implication: if the light around you changes substantially after you set manual exposure, your image will get too dark or too bright. Cloud moving in front of the sun, walking from the sun into a shaded bay, an overhead light coming on — any of these can throw the exposure off. The fix is one of:
- Tap Reset to return to Automatic and let the camera re-measure.
- Re-set the manual values for the new lighting (the slider will start near whatever the camera was last using).
- Stay on Automatic for the warm-up swings and only switch to Manual once you're settled.
How to know it's working
After you've set a faster shutter speed, capture a normal full swing and review the impact frame in the filmstrip. Compare it to a frame from before you adjusted:
- Better: you can see the clubhead clearly. The shaft has crisp edges. You can read the dimples on the ball if it's still in frame.
- Same blur: shutter wasn't fast enough — bump it up another notch.
- Frame is now dark: raise the ISO slider until brightness looks right.
- Frame is grainy / noisy: ISO is too high for the available light. Either accept the grain for the sharper motion, or back the shutter off slightly.
How to reset
Tap Reset on the exposure card. The sun icon turns white again and the camera goes back to fully automatic exposure. Useful when lighting changes, when you're moving between bays, or just when you want to start over.
If you can't find a setting that works
Send us a sample clip and your environment details to support@motionedge.ai. Include:
- Lens you were using (back wide, ultrawide, etc.)
- What lighting you were under (outdoor sun, simulator bay, range overhead lights, etc.)
- What shutter speed and ISO you tried
- A 5-second clip showing the blur or flicker you're seeing
We can almost always look at the clip and tell whether it's a settings problem, a lighting problem, or something the app should handle better.
See also: Indoor Simulator FPS for LED flicker and frame rate guidance. Filmstrip & Video Quality for camera stability and trim hygiene.