Reading the Capture Screen — Border Colors, Skeleton, and Logging
When auto-detect is running, your screen tells you exactly what the system is doing — through a colored border around the screen and (if you turn it on) a skeleton overlay drawn on top of the camera feed. Once you can read those two signals at a glance, the whole capture flow stops feeling mysterious. This article maps the visual vocabulary, walks through the Logging section in Capture Settings, and shows what to do when something looks off.
The two visual signals
Two things you can see on screen during auto-detect tell you everything about what the system is doing:
- The border around your screen. A colored frame, four states deep, that changes as you move into setup, settle into address, and swing. This always shows — there's no toggle.
- The skeleton overlay. Dots and lines drawn on the camera feed showing where the pose engine sees your joints. Off by default; you turn it on in Capture Settings when you want to see what the system is seeing.
The border is the system telling you what state it's in. The skeleton is the system showing what it's seeing. They answer different questions.
Border colors — what your screen is telling you
The colored frame around your screen reflects the four-step state machine auto-detect runs through every time you set up to swing.
| Border color | State | What's happening | What to do |
|---|---|---|---|
| No border | Inactive | Auto-detect is off, or not running yet | Turn on auto-detect from the camera mode picker |
| Red-orange | Scanning | Detector is running but it can't find a golfer in the frame | Step into frame; make sure your full body is visible |
| Yellow | Golfer Detected | You're in frame, but not yet at address — the system is waiting for you to settle | Get into your setup position and pause for a beat |
| Green | Monitoring / Ready / Reviewing | Armed and watching for a swing (or finishing one) | Swing away |
| Blue | Cooldown | Just captured a swing; brief pause before re-arming | Wait a second — next swing will be detected right after |
A few practical notes:
- Red-orange isn't an error. It just means "I can't see you yet." If you're standing in the bay and you see red-orange that doesn't change, check your distance and lighting before assuming the app is broken — the system literally hasn't resolved a golfer yet.
- Yellow means almost ready. It usually transitions to green within a second once you stop moving. If yellow drags on, you're either still settling, or the system is waiting for the small moment of stillness that means you're addressing the ball.
- Green is go. Anything you do during green can fire a swing detection.
- Blue is the brief cooldown after a save. It's intentional — prevents the same swing from being captured twice. Usually ~1 second.
The same border shows on both devices in a Remote + Director setup — see the Remote vs Director article for which device's state is reflected where.
The skeleton overlay — what the pose engine sees
If you turn on Show Live Skeleton in Capture Settings, MotionEdge draws dots and lines on the camera feed showing where the pose engine has detected your joints frame by frame. The dots are color-coded by confidence — how sure the model is about each individual joint:
| Dot color | Confidence | What it means |
|---|---|---|
| Green | ≥ 0.7 | Joint is confidently resolved. Detection is using it. |
| Yellow | ≥ 0.3 (body-gate threshold) | Joint is detected but at lower confidence. Still counted for body-gate checks. |
| Red | < 0.3 | Joint detected, but too low-confidence for detection gating. |
| Gray | Absent | The model couldn't find that joint at all in this frame. |
In other words: greens are joints the system trusts, yellows are joints it's getting by on, reds are joints it doesn't trust, and gray means it lost the joint entirely for that frame.
What does the pattern of colors tell you?
- Most joints green, a few yellow: healthy detection. Normal during a real swing — wrists especially can flicker yellow at the top of the backswing or impact.
- Shoulders and hips green, wrists yellow or red: your full body isn't well-lit or in frame. Step closer, fix the lighting, or check your wardrobe contrast — if your sleeves blend into the wall behind you, the wrists are hard to find.
- Lots of red or gray: the camera and the body aren't getting along. Could be backlight, low light, a busy background, or you're too far from the camera. The Reducing Motion Blur — Shutter Speed and ISO article covers the lighting and shutter side; for the rest, step closer and clear the background behind you.
Should you leave the skeleton on always?
No — it's a diagnostic, not a normal-use overlay. Most users:
- Turn it on when setting up at a new location for the first time, or when tuning sensitivity, to confirm that the pose engine is finding their body cleanly.
- Turn it off for normal capture, so the screen stays clean and you can see your video without joint dots on top.
There's no penalty for leaving it on — it doesn't slow anything down — it's just visual clutter when you don't need it.
Why does my skeleton flicker?
Because pose confidence varies frame to frame with lighting, motion blur, and body angle. A wrist passing through a high-contrast edge in your shirt, the club crossing in front of your body at the top of the backswing, a flicker from indoor LEDs — any of these can drop confidence for a frame or two. The skeleton "jumps" while the colors shift around.
Flicker is normal. It only becomes a problem when it's bad enough to cause missed detections — that's a lighting issue, not a visual issue. The Reducing Motion Blur — Shutter Speed and ISO FAQ covers how to fix flicker when it gets serious (a faster shutter spans the LED's flicker cycle); the Auto-Detect Sensitivity FAQ covers what to do if it's actually missing swings.
The Auto-Detect tuning panel
Alongside the border and the skeleton, there's a third on-screen signal in auto-detect mode: the AUTO-DETECT panel. It's a live readout of the three checks every swing has to clear to be captured — ① Stillness, ② Speed, and ③ Arc — each with a bar showing what you just did versus the threshold it has to beat, plus a combined verdict, a plain-language hint, and a settings gear.
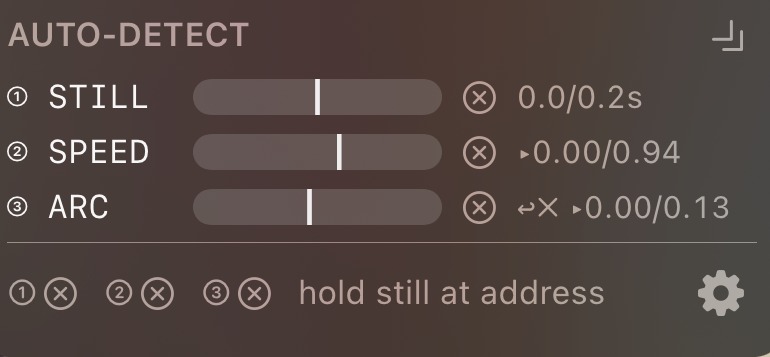
This is the panel you watch when you're dialing in detection: take a practice swing, see how close your motion came to each threshold, and adjust the Sensitivity slider until real swings clear the bars and waggles don't. The full walkthrough — how to read every bar and tune by eye — is in Auto-Detect Sensitivity.
The Logging section in Capture Settings
The Logging section in Capture Settings exists so you can hand us the data we need when something isn't working. Here's what's there.
Joint trace — always on
A short caption at the top of the Logging section says: "Joint trace is always captured (rolling, bounded ~2 MB) and bundled with support requests automatically."
This is the small per-frame record of what the detector saw — joint positions, state transitions, detection-gate decisions. It rolls continuously (older data is thrown away as new data comes in, capped at about 2 MB on disk), and it's automatically bundled into every support email you send through Settings → Support → Attach Log Files. You don't need to do anything to enable it. It's just there when we need it.
Save Recent Diagnostic Video
A button labelled Save Recent Diagnostic Video that captures the last ~30 seconds of what the camera saw into a single file. The in-app caption explains the workflow:
"Captures the most recent ~30 s of camera video into a single file for support diagnosis. Start auto-detect and let the buffer fill; if you observe a detection issue, return here and tap this button. The saved snapshot is included automatically when you tap Share Trace Files."
The practical flow:
- Turn on auto-detect and take a few swings (or try to — if it's missing them, that's the whole point).
- As soon as you see the issue, leave the camera view and come into Capture Settings.
- Tap Save Recent Diagnostic Video. The last 30 seconds gets saved.
- Tap Share Trace Files. Both the joint trace JSON and the saved video get bundled into a single share — email it to support@motionedge.ai with a one-line description of what you were trying to capture.
This is the most useful thing you can do when reporting a detection bug. The joint trace alone tells us what the system computed; the video tells us what the system actually saw. Together they let us reproduce the exact decision the detector made.
Worked examples
"My screen was yellow the whole time and never went green — why?"
Yellow means the system can see you in frame but is waiting for you to settle into address. If you stayed yellow without ever flipping to green, the most likely causes are:
- You weren't still enough. The transition from yellow to green requires a brief moment of relative stillness at address — about half a second. If you have a busy pre-shot routine (waggles, looking up and down at the target, repositioning the club), you may keep restarting that timer.
- The system never fully resolved you. If your skeleton has a lot of yellow or red joints, the body-gate check that promotes you to green won't fire. Step into a better-lit spot, get closer to fill more of the frame, and re-check.
Fast check: turn on Show Live Skeleton for one session. If your dots are mostly green, the issue is stillness — pause at address for a beat. If your dots are heavy on yellow/red, the issue is body visibility — fix lighting, distance, or contrast.
"My screen flashed red-orange briefly when I stepped into frame, then went yellow, then green. Is something wrong?"
No — that's the normal sequence. Red-orange = system hasn't found a golfer yet. The moment you step in, it usually transitions to yellow within half a second, then to green when you settle. Seeing all three colors in a few seconds is exactly the right flow.
"I see green, swing, and the border goes blue — what's blue again?"
Blue is the brief cooldown after a swing is captured. It prevents the same swing from firing detection twice. Wait a beat, the border returns to green, and the next swing will be detected normally.
"Why are my wrists always yellow even though my body is green?"
Wrists are the hardest joints to detect in golf because they move fastest, sit at the edge of the body, and often blend into clothing or the club. Yellow wrists during a swing is almost always normal — the body-gate doesn't require green-on-everything to fire, and the per-frame yellow at impact is the model honestly reporting "I can see something there but the confidence dropped during fast motion."
If wrists are yellow during address (when you're standing still), that's a setup issue worth investigating — usually contrast against the background or lighting on your hands. Adjust position and watch the dots change in real time.
When to turn each toggle on (quick reference)
| Setting | Default | Turn it on when... |
|---|---|---|
| Show Live Skeleton | Off | Setting up a new location, tuning sensitivity, troubleshooting "is the pose engine finding me?" |
| Audio Alerts | Off (your choice) | You want a beep when the system enters Ready or fires a Swing Detected — most useful on the Director, suppressed automatically on a Remote tripod device |
| Joint trace | Always on | (no toggle — bundled automatically with support emails) |
| Save Recent Diagnostic Video | Manual button | After you see a detection issue, before you leave the camera screen — captures the last 30 seconds for support |
Where to find the Logging section
In the camera view, open Capture Settings, scroll to the Logging section.
The Share Trace Files button is in the same section — it bundles the always-on joint trace plus the on-demand diagnostic video (if you saved one) and lets you send the lot to support in one tap.
Quick checklist when auto-detect isn't working
- What color is the border? Red-orange → step into frame. Yellow → pause at address. Green → swing should detect.
- Turn on Show Live Skeleton for one session. Are your shoulders, hips, knees, wrists, and ankles mostly green? If not, that's where the gap is.
- Tune sensitivity if dots are green but swings aren't firing — see Auto-Detect Sensitivity.
- Fix lighting if dots are heavy on yellow/red/gray — see Reducing Motion Blur — Shutter Speed and ISO.
- Save the diagnostic video and send it to support if you've tried the above and it still won't behave. We can almost always tell from the trace + video what's going on.
See also: Auto-Detect Sensitivity for tuning what counts as a swing. Reducing Motion Blur — Shutter Speed and ISO for indoor LED fixes. Remote vs Director for which device shows what in a two-device setup.